How to Assemble a Balloon Arch: Step-by-Step Guide for Beginners
Have you ever walked into a party and immediately felt the excitement just because of the decorations? Balloon arches have that effect. They turn a simple doorway, stage, or backyard into a place that feels special.
For many beginners, though, balloon arches seem intimidating. You picture hours of work, balloons popping left and right, and a structure that never looks like the photos online. The truth is, once you learn the basics, creating one is much easier than it looks. With clear step-by-step balloon arch instructions, anyone can build a show-stopping centerpiece.
In this guide, we'll walk you through everything, from choosing your balloons to putting the final touches. By the end, you'll know how to plan, build, and perfect an arch that makes guests stop and stare.
Why Balloon Arches Make Events Pop
Before we dive into the practical part, let's talk about why balloon arches are so loved. They're not just piles of balloons tied together; they're statement pieces.
A balloon arch can serve many roles. It might frame the entrance to a wedding, highlight a dessert table at a birthday, or create the perfect photo backdrop at a graduation. No matter the occasion, it adds energy and color in a way that feels instantly festive.
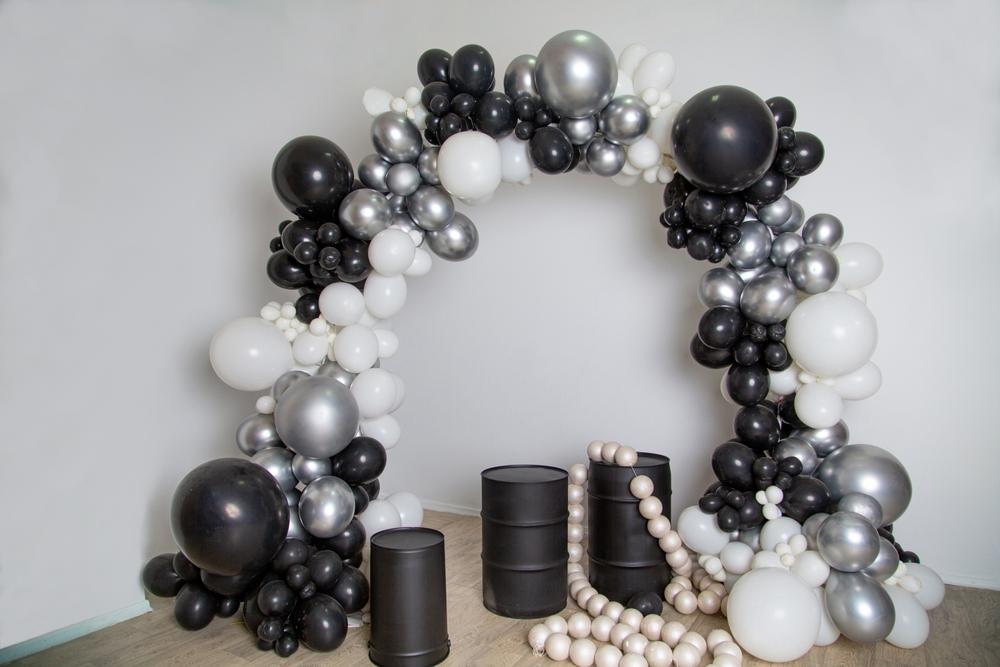
Another reason they're popular is flexibility. You can go big and dramatic with a full arch, or small and cute with a tabletop design. You can match the theme using two or three colors or keep it minimal with a single shade. The best part is you don't need to be a professional decorator to pull it off. With the right guidance, you can design one that feels tailored to your event.
Tools and Materials You'll Need
Jumping straight into building a balloon arch without supplies is a recipe for stress. Having the right materials ready saves time and avoids last-minute trips to the store.
Here's what you'll need:
-
Balloons: Choose high-quality latex balloons in at least two different sizes. Mixing sizes adds dimension.
-
Balloon pump: Electric pumps speed things up, but a manual one works for smaller arches.
-
Balloon strip or tape: Plastic strips with holes make arranging balloons easier.
-
Fishing line or floral wire: An Alternative to strips for a more flexible frame.
-
Command hooks or a sturdy base: Helps anchor the arch to walls or freestanding poles.
-
Scissors and clear tape: For trimming and quick fixes.
-
Glue dots: Perfect for attaching smaller balloons to fill gaps.
One simple tip is to buy extra balloons. Expect about 10–20 percent to pop during inflation or setup. With these tools in place, you'll work faster and avoid frustration. Plus, when you're well-prepared, you'll have more energy to focus on making your arch look polished and creative.
Step-by-Step Balloon Arch Instructions
Now that you've planned, it's time to bring your balloon arch to life. This process is easier when broken into simple steps.
Step 1: Inflate the Balloons
Use your pump to inflate balloons in different sizes. Some should be larger, while others should be smaller. This mix adds texture and avoids a flat look.
Step 2: Create Balloon Pairs
Tie two balloons together around their necks. Make several of these pairs.
Step 3: Build Clusters
Take two pairs and twist them together to form a cluster of four. This becomes the building block of your arch.
Step 4: Attach to Strip or Line
If you're using balloon strip tape, insert balloon knots through the holes. For fishing line, wrap the line around clusters and secure tightly.
Step 5: Shape the Arch
As you continue adding clusters, bend and adjust the strip or line into an arch shape. Use hooks or a base to hold it in place.
Step 6: Fill the Gaps
Once the main arch is in place, step back and look for any gaps or empty spaces. Add smaller balloons with glue dots to fill them.
Pro Tips for a Professional Look
Once your arch is up, a few tricks can make it look polished and professional.
-
Mix sizes: Large balloons form the structure, while smaller ones fill gaps.
-
Stick to odd numbers: Use three or five colors instead of four for a more balanced look.
-
Add extras: Greenery, artificial flowers, or fairy lights can elevate the design.
-
Check symmetry: Step back frequently to ensure the arch appears even.
-
Hide flaws: Use mini balloons to cover empty spots or exposed tape.
Another tip is to build your arch in layers. Start with the main structure, then add finishing touches, such as accent balloons or decorations. This approach keeps the arch sturdy while giving you room for creativity.
Here's the thing: nobody notices small imperfections. Guests will be too busy admiring the big picture or snapping photos in front of it. So don't stress if a balloon sticks out or a cluster looks slightly uneven. Sometimes, these imperfections make the arch look more natural and organic.
Common Mistakes and How to Avoid Them
Even with careful planning, beginners often run into the same issues. Luckily, these are easy to fix or avoid.
-
Overinflating balloons: This makes them pop faster, especially in hot weather. Stop inflating once they're firm but not stretched.
-
Unstable base: Without strong anchors, arches can collapse. Always use command hooks, weights, or poles for support.
-
Too few balloons: Underestimating the quantity leaves gaps. Always have extras ready.
-
Clashing colors: Bright colors can be fun, but too many shades can overwhelm the design. Stick to a simple palette.
One more mistake is rushing. Balloon arches take time, especially your first one. If you try to finish quickly, you'll likely get frustrated or end up with a wobbly structure. Please plan, start early, and approach it as a creative project rather than a chore.
Conclusion
Creating a balloon arch is one of those skills that looks harder than it really is. Once you follow simple steps, you'll realize it's more about patience than perfection. Next time, if you're hosting a birthday, shower, or graduation, try building your own arch. You'll not only save money but also enjoy the satisfaction of creating something with your hands. Guests will love it, and you'll feel proud every time someone stops to admire your work. For more creative inspiration, you can also Explore Animations on Easemble and see how professionals bring ideas to life. So grab your balloons, get your pump ready, and start creating your first arch.